3 Ways to Organise and Tidy Your C# Unit Test Projects
Hi Friends.
When writing tests, we often start with what we think will be typical use cases for our code. It’s common to begin with the happy path, where we expect a certain outcome from our modules being used in a particular way (e.g. calling a method with a specific input should produce a known output). We might add tests for unhappy paths too; we explore ideas of how things might go wrong, checking for error handling and corrective measures. Doing this might prompt us to include further tests to catch edge cases. And then we might want to run them with multiple datasets to check that expected results don’t come by chance.
Before long, it’s easy for test files to contain hundreds (or even thousands) of lines of code – especially for complex services. And while having well-tested code is a good thing, it can become difficult to navigate and find things in large files: when other members of the team (or your future self) come to add more tests, it might not be obvious where to put them if we want to keep similar themes grouped together.
In this article, we’ll look at a few things we can do to keep our test projects as tidy as possible.
1. Have Similar Project Names
While it’s likely you do this already, it’s worth mentioning that we should keep tests separate from production code:
It introduces a separation of concerns. As a by-product, projects will be easier to navigate as they’ll have fewer files. Build artefacts will be smaller too, as they won’t include material that isn’t needed at runtime.
We might need different settings (e.g. using connection strings to separate databases) when testing. Having separate projects (and therefore configuration files) makes this easy to manage.
Tests are usually built with compiler settings that make debugging easier (e.g. with additional logging), whereas release builds are typically optimised for performance.
Addition dependencies (e.g. mocking libraries) shouldn’t be included in release builds.
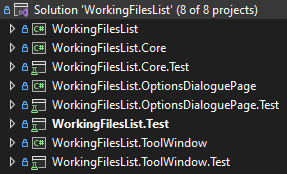
However, having some association between production and test code will make our solution easier to navigate. One way to do this is to name test projects after the ones they test. We can see the Solution Explorer tool window from Visual Studio with WorkingFilesList open in Figure 1. The test projects have similar names to those containing production code, but with a .Test suffix. For example,
Tests for
WorkingFilesList.Corelive inWorkingFilesList.Core.Test.Tests for
WorkingFilesList.ToolWindowcan be found inWorkingFilesList.ToolWindow.Tests.

2. Mirror the Folder Structure
It’s possible to apply this ‘mirroring’ within our test projects too. Figure 2 shows a partially expanded view of WorkingFilesList.Core and WorkingFilesList.Core.Test. The projects’ structures are nearly identical and test files are named after the files they test, but with a Tests suffix. In addition to hinting at the location of each file’s counterpart for manual navigation, this approach also makes searching for class and file names (and even namespaces) easier because of their similarities.
3. Group by Method Name
With our projects structured, we’re left with one potential problem. The amount of code in our test files grows as we write more tests. At a certain point, we may find the files themselves difficult to navigate. To avoid duplication, we might want to know if a particular area has tests before adding more. Or we might want to find specific tests to modify. But they might be difficult to find in files with large amounts of code.
When we explored the Arrange/Act/Assert test layout, you might remember it’s usually best to keep the Act section to a minimum – we generally aim to have only one line, where we call a method to trigger the logic we want tested. Based on this, we can group by that method by adding a class named after it inside our main test class. To help explain this concept, let’s imagine we’re writing tests for the ComplexCalculationService we introduced last week (I didn’t use this in WorkingFilesList as I hadn’t learned of this technique yet). If we wanted to test its RunCalculation, SubCalculation1, and SubCalculation2 methods, we could structure it as following:
public class ComplexCalculationServiceTests
{
    class RunCalculation
    {
        [Test]
        public void CalculationResultIsCorrect()
        {
            // Arrange, Act, Assert
        }
    }

    class SubCalculation1
    {
        [Test]
        public void SubCalculation1Correct()
        {
            // Arrange, Act, Assert
        }

        [Test]
        public void SubCalculation1DoesNotThrowException()
        {
            // Arrange, Act, Assert
        }
    }

    class SubCalculation2
    {
        [Test]
        public void SubCalculation2Correct()
        {
            // Arrange, Act, Assert
        }

        [Test]
        public void SubCalculation2DoesNotThrowException()
        {
            // Arrange, Act, Assert
        }
    }
}
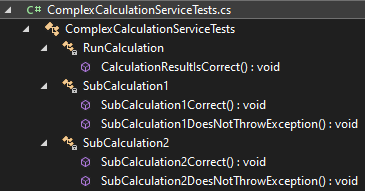
By adding this grouping, we can use the class names to help us navigate the file; it becomes easier to see where tests are for specific functionalities, and this extends to the Solution Explorer too. In Figure 3 we can see the classes become nodes within the tree structure.

Summary
Tests are useful, but you need to organise them when you have many. You can do this at 3 levels: the projects, the folders within them, and the code/classes. By naming your test projects and files after the ones they test, you achieve two important things:
Projects and their test counterparts become easier to navigate because they share the same structure.
Files and namespaces are easier to search for due to similarities in their names.
It’s also possible to create classes to add groupings within your test files. As you typically call a single method to trigger the logic that needs testing, one idea is to name your classes after those methods.
Bonus Developer Tip
File scoped namespace declarations (introduced in C# 10) are a great way to keep your code indentations to a minimum. Where the contents of a file all belong in the same namespace, you can declare it without curly brackets. The following are simplified versions of Microsoft’s examples.
Before:
namespace SampleNamespace
{
    class SampleClass { }
}
After:
namespace SampleFileScopedNamespace;

class SampleClass { }
These tips are exclusively for my Substack subscribers and readers, as a thank-you for being part of this journey. Some may be expanded into fuller articles in future, depending on their depth.
But you get to see them here, first.


